I have recently read a couple of blogs going around facebook. Very real moms talking about how Pinterest makes us feel. From organizing to not having enough time to be a crafty art mom. I'm addressing this because I'm a mom who does like Pinterest as well. I did feel like I should be doing more with my daughter and that is how this blog got started! I also don't want this blog to be another blog of things you can't do with your child.
All moms are busy everywhere! We all struggle with jobs, and housework and our children, Yes even the stay at home moms! I'm a SAHM, and I do some direct selling which helps my family with a little extra income. I too struggled with trying to balance everything from home to me time. I RARELY get me time and when I do, I cherish it!
I believe this "Pinterest issue" isn't just with pinterest! It has always been with something else, at first it probably started with our family, then neighbors, then movies & TV, then magazines like Better Homes & Gardens, to the Martha Stewart magazine. See this issue isn't with the outlet, its with us moms trying to be Super moms! There is this image out there that all moms should be Super Moms! Yes there are Super Moms out there who do everything PERFECTLY! To those of you who are Super Moms, Kudos to you! But its a very small percentage compared to the REAL MOMS who struggle daily trying to balance life!
When you come to my house, I'm sorry its not spic and span, it's clean but I'm gonna have clutter! Yes, there will be toys everywhere because, I do live with a toddler! But I try very hard, I feel accomplished if my daughter is feed, clean, I've cooked dinner, washed the dishes and had enough time to work out! That's an accomplished day for me! I may only have one child but she sure keeps me busy. When she is in preschool two days a week, I'm not getting a mani/pedi or a massage, I'm busy visiting my father at the nursing home. On the days I stay home, I'm doing errands or I try and have an at home day. I have been trying to do at least one activity with my daughter a week! That way I feel better about being a busy mom!
Now the topic of my blog, sorry if I tend to ramble, lol! Is to not let society make us feel bad if we can't be Super Moms! A blog, magazine, TV or even a movie will not make us love our children and families more. It's not a measurement of our love for them! We CAN and DO love our family and children without being a super mom! Just try to Feel Happy, which will make you Be Happy and then we can Show Happy!
Yesterday I made my daughter a happy face for her breakfast. Two small pancakes for eyes whipped cream for a nose and a banana for a smiley mouth!
Today I made her another smiley face with cheerios as a face, banana for a smiley mouth, and strawberries for eyes and a nose and a strawberry for a tongue!
This was me being my own version of a Real Super Mom! My extra couple of minutes taken out of my day to make my daughter smile! This is what its like to be a Real Super Mom! We can all be Real Super Moms in our own way, do not let social media or any one else make you feel anything less than what you are!!
Feel Happy, Be Happy and Show Happy!
Monday, April 16, 2012
Friday, April 6, 2012
Laughing Bunny
I saw this Laughing bunny with foam paper on a craft website where you can buy the crafts for a class. I thought, how cute!....I can make this at home and adjust it some!
*This a parent and child activity, I did have to help my daughter some.
Supplies needed:
3 pieces of construction paper 2 white and 1 pink
1 piece of pipe cleaner black or grey
1 bag of cotton balls
Elmer's School Glue
1 paper plate (we used foam)
2 adhesive wiggly eyes
Scissors
Marker
10 minutes to set up.
Approx 20 min project time.
Fold the a piece of the white construction paper in half. Trace your child's hand on the white construction paper with a marker then cut out the hand print and set aside.
Cut out two bunny ears with white construction paper.
Cut out two pink smaller bunny ears for the inside of the ears.
Place some glue on the pink ear have your child help you.
Put the glue side down on the white ear, I had my daughter help pat the ears down so they stay glued.
Repeat on second ear and let them both dry.
Get your paper plate.
Place glue on your all over the foam plate.
Place cotton balls next to the plate and have your child place
them on the plate. You will have to guide them to the open spots
they missed and putting on more glue.
Leave an area on the top rim for the bunny ears open.
When done have them press down on the cotton balls
to make sure they stick.
My daughter loved doing this!
Put glue on the bottom back of the bunny ear.
Then place ears on the top of plate.
Then place cotton balls with glue over the bottom of the ears.
Cut the pipe cleaner in half and bend both.
Place glue on the pipe cleaner.
Place them on the ends of the plate, cheek area.
Have your child help you and help by pressing with their hands so it sticks.
With the left over construction pink paper make a nose.
Put some glue on the nose and place in between the pipe cleaners, and have your child press down with their hands to make it stick.
Take out two wiggly eyes and have your child place them on.
Take the hand prints you cut out and glue them on the bottom, and have your child place them where the mouth would. Like the bunny is covering his mouth laughing!
Let dry and your done!
This is a fun project so just relax if they rip something or
place something in the wrong place.
place something in the wrong place.
My daughter loved the hand print so much she ripped it!
We had to make a new one.
We had to make a new one.
Every art project is a learning process! Just sit back and Have fun!
Thursday, April 5, 2012
Matching and Counting Felt Spring Eggs
I'm a fan of Pinterest, and while searching for Spring toddler crafts I found a blog that did matching Easter Egg Cards. Very cute idea, but I thought I would expand it some and make the idea better!
So here came my expanded idea of Felt Spring Eggs that you match to color as well as to the number of buttons on each egg. Which will make a good counting/matching/memory game for you and the little one for many years to come!
**Please note this is a Parent Project. Since it involves cutting, hot glue gun/sewing!
It can be modifed to work with an older child pre-k see notes below.
Supplies Needed:
10 Spring Colored Felt 5 should be the same darker color.
(can be found at any craft store, usually 25 cents each)
105 Spring Colored Buttons (bag of buttons can be found at walmart or any craft store $6)
Scissors
Hot Glue Gun or Needle or thread (depends on your preference)
One piece of paper for Egg Cut Out
Ribbon/puffy paint (optional)
Marker
Aprox time for project: 3 hours or less
On your Piece of Paper Draw an egg with a marker. Please remember it has to be big enough to hold 10 buttons. Then Cut the paper egg.
Use the paper egg as a template for cutting out your felt eggs. Fold the felt in half and cut out 20 eggs. Use the darker color as the underside of your eggs. So when flipped over you cant tell them apart if using various spring colors.
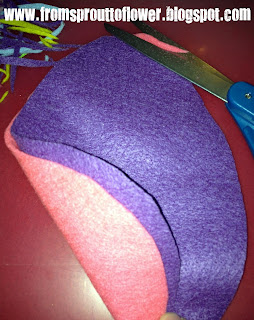
Place the spring egg felt front with the darker spring egg felt back and trim so they match. We used different spring colors and purple for the back.
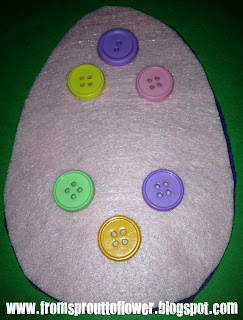
Sew or hot glue gun a button on each half for corresponding number. ex. 10 buttons on one half and 10 buttons on bottom half to match!
Make sure you leave space in the middle to place ribbons/puffy paint and also to cut in half.
You can embellish them if you would like with matching different color ribbons on the bottom or with puffy paint. Its all up to you and your time!
We used ribbon, glue the underside, then glue the rest of the ribbon and press on it to make sure it sticks.
Make sure to leave space in between ribbon or puffy paint to cut in half.
Then glue the remainder of the ribbon and tuck it under.
Cut the eggs in half.
Separate light and dark color bottom egg halves. Apply hot glue on the light color bottom egg half.
Press the dark color bottom egg half onto the light color bottom egg half so the glue will hold.
Now trim the edges make sure the side with the button color felt can not be seen if your using different colors. This way when playing a matching memory game the child cant see the colors.
Seperate light and dark color top egg halves. Apply hot glue on the light color top egg half.
Press the dark color egg top egg half onto the light color top egg half so the glue will hold.
Now trim the edges make sure the side the button color felt can not be seen if your using different colors like pictured here.
What your finished Spring Egg front side looks like!
What your finished Spring Egg front and back side look like!
Once you've done the 10 eggs your done!
Make sure you enjoy using these with your child!
These eggs can be used in many ways:
-Counting
-Matching
-Memory Game
-Colors
This project can be modified to use any type of object like flower, pumpkin, tree, depending on the season! We used the eggs idea since its springtime!
*Now this project can be modified to work with a preschooler to kindergartner so they can help you make it. Instead of needle and thread or Hot glue gun, replace that with Tacky craft glue so they can help you glue the buttons on. Please be aware that with tacky glue you will need time for the buttons on the eggs to dry before you can cut them in half and then glue them together.
*Please watch your child play with these eggs, since they do involve buttons! Buttons can be a choking hazard if they fall off, are pulled, or not glued enough!
Monday, April 2, 2012
Simple Easter Egg Cards
My daughter goes to preschool and she has to bring in some eggs to hand out to other children. So I thought what a cute Idea to have her make cards. Please keep in mind she is two years old so we needed something simple!
*For PreK to Kinder you can add more stamps and do folded construction paper cards and even have them decorate them with markers!
Supplies you will need:
Kitchen sponge
Paint Tempra or finger paint
1 Paper plate
Smock/or clothes you don't mind them getting paint on
Construction paper
Scissors
Newspaper or tray to paint on
Marker
Set up time if you have all items 5 min.
Project time is less than 30 min.
*For PreK to Kinder you can add more stamps and do folded construction paper cards and even have them decorate them with markers!
Supplies you will need:
Kitchen sponge
Paint Tempra or finger paint
1 Paper plate
Smock/or clothes you don't mind them getting paint on
Construction paper
Scissors
Newspaper or tray to paint on
Set up time if you have all items 5 min.
Project time is less than 30 min.
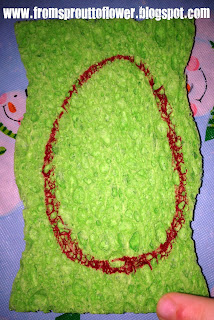
Take your sponge and using your marker draw an egg shape.
Cut out the egg shape with your scissor.
Put some Paint on your paper plate.
Place your desired paper on tray or newspaper.
Place your sponge in the paint and put on paper.
You may have to help your child depending on age! I helped steady the paper for my daughter.
After they are done, lay them out to dry!
You can pretty them up with glitter glue pens or markers, and remember to add names and date.
Ill be using a sharpie pen and adding my daughters name.
These are meant to be simple cards.
Also when done let your child have fun stampin' away on construction paper, like we did at my home!
My daughter is loving our new crafting time!
If you love our projects, share us with your friends and follow us!
Wednesday, March 28, 2012
Cloud Playdough
Our adventures with playdough commence! Now there are so many recipes out there, from eatable playdough to playdough with coffee, or jello, kool-aid, to just plain old salt play dough.
I decided to start with a very easy recipe I found. I came to this decision when I realized I didn't have any salt, besides sea salt in the house....and since I didn't want to use our good salt, lol!
I found this easy recipe that didn't include salt! Since my mom sent it to me, I didn't know where it came from, so google to the rescue and found this website.
http://applesaucekids.com/LinkPage/PlayDoug.html
Cloud Playdough
1 cup of water
1 1/2 cup of vegetable oil
6 cups of flour
Food coloring (optional)
Cookie cutters (optional)
Smock (optional)
Household bowl/ or roasting pan
Container to put Cloud Playdough in. (I used a ziploc bag)
Pour 6 cups of flour into a roasting pan/bowl.
In your water, add a couple of drops of your desired color.
Combine water into flour bowl.
Combine Oil, into water and flour bowl mixture.
Mix well with your hands.
Knead well.
Add more water if necessary, in small amounts until dough is soft and stretchy. I found I did need a little bit more!
When mixed well and looks like playdough consistency, It's ready! Let your child know this playdough is not for eating! They will be tempted!
Cloud playdough should be used on a washable surface for it is very greasy.
I put my Cloud Playdough in a ziploc bag! After storage, your cloud dough will seperate some (oil from dough) so before you use it next time just remix quickly in bag or container!
I hope you enjoyed me blog today, this was a wonderful experience for me and my daughter! Please follow us and come back for our next activity!
I decided to start with a very easy recipe I found. I came to this decision when I realized I didn't have any salt, besides sea salt in the house....and since I didn't want to use our good salt, lol!
I found this easy recipe that didn't include salt! Since my mom sent it to me, I didn't know where it came from, so google to the rescue and found this website.
http://applesaucekids.com/LinkPage/PlayDoug.html
Cloud Playdough
1 cup of water
1 1/2 cup of vegetable oil
6 cups of flour
Food coloring (optional)
Cookie cutters (optional)
Smock (optional)
Household bowl/ or roasting pan
Container to put Cloud Playdough in. (I used a ziploc bag)
Pour 6 cups of flour into a roasting pan/bowl.
In your water, add a couple of drops of your desired color.
Combine water into flour bowl.
Combine Oil, into water and flour bowl mixture.
Mix well with your hands.
Knead well.
When mixed well and looks like playdough consistency, It's ready! Let your child know this playdough is not for eating! They will be tempted!
Now it's time to have fun! Pull out the cookie cutters or if you have child size rolling pins or mallets, you can use them too! Just let your child use their imagination! We made flowers and butterflies and meatballs and pancakes! She loved it!
I put my Cloud Playdough in a ziploc bag! After storage, your cloud dough will seperate some (oil from dough) so before you use it next time just remix quickly in bag or container!
I hope you enjoyed me blog today, this was a wonderful experience for me and my daughter! Please follow us and come back for our next activity!
Subscribe to:
Comments (Atom)


